> to Japanese Pages1. Summary
In this post, I explained “GlusterFS” as one of the source code synchronization solutions between web servers in a clustered environment. If we use this solution, the difference in source code due to deployment time lag will not occur between web servers. In addition, since “GlusterFS” is a distributed parallel fault tolerant file system, the effective range of this solution is not limited to Web servers. Depending on how you use it, you can build any fault tolerant file system on a large system.2. GlusgerFS Introduction
Are you using “rsync” or “lsyncd” for synchronzing the file system between each node in a business cluster environment? To make the story clearer, I will explain web servers as an example, but this issue is not limited to web servers. There are several ways to synchronize project source code between web servers in a cluster environment. First, let's give some Bad know-how. For example, I often hear how to synchronize to each node using a shell script with “rsync” implemented. Even if you manually deploy to each node, the problem will be few if the system is small. However, even if synchronization is automated using “cron” with the shortest period, source code differences will occur for up to one minute. In addition, I sometimes hear how to automatically detect source code changes using “lsyncd” and synchronize incrementally to each node. However, this synchronization method may take several tens of seconds at the shortest before synchronization is completed. Furthermore, these synchronization methods are unidirectional synchronization, so there are no guarantee of data consistency. I also hear pretty much how to automatically deploy to each node using ci tools. However, these synchronization methods only fill the time difference between manual and automatic, which is not a fundamental solution. If these synchronization processes are performed to each node by serial processing, there will be a time difference of “number of nodes x time difference” until synchronization is completed. It would be better to do it at least by parallel processing. If these statuses are not a problem in UX, data management and other aspects, this post will be useless. If there is a problem, there are a number of these solutions. As one of its solutions, you have a way to use “GlusterFS.” GlusterFS is a distributed parallel fault tolerant file system. One of the advantages of using GlusterFS is that fault-tolerant design can be realized, such as file system distribution, synchronization, capacity increase/decrease can be realized with no system stop. Naturally, synchronization is bidirectional and there is no concept of master and slave. However, you should not include files in this volume what will continue to be locked by the daemon. If you do not make a mistake in usage, GlusterFS will do a great deal of power. In this post, I will explain how to implement GlusterFS. In this post, I will not announce actual measurements on sync speed, so you should implement and judge.3. GlusterFS Architecture
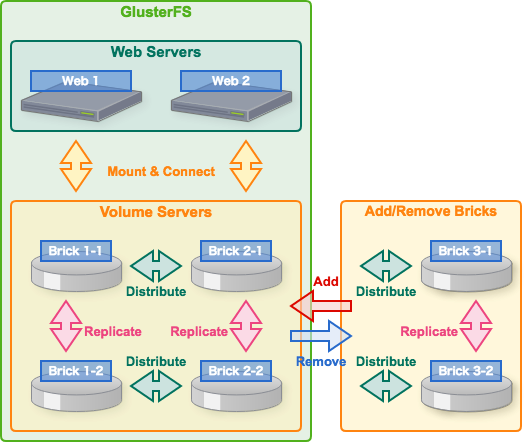
The following figure is a rough concept of GlusterFS.In addition, the following figure is a structure example of this post.It does not prepare volume server cluster, it is a simple self-contained structure. The Web server itself is a volume server and a client, and it is a mechanism that mounts from the client and connects to its own volume. Naturally, it is possible to change the system configuration by increasing/decreasing the brick.4. GlusterFS Environment
CentOS-7 GlusterFS 3.125. GlusterFS Servers Configuration
5-1. Install GlusterFS servers
# Both Web Server 1 and 2$ sudo yum -y install centos-release-gluster $ sudo yum -y install glusterfs-server5-2. Startup GlusterFS servers
# Both Web Server 1 and 2$ sudo systemctl start glusterd $ sudo systemctl enable glusterd $ sudo systemctl status glusterd5-3. Set GlusgerFS hosts name
# Both Web Server 1 and 2$ sudo vim /etc/hosts10.0.0.1 web1.example.com 10.0.0.2 web2.example.com5-4. Create GlusgerFS storage pool
# Only Web Server 1$ sudo gluster peer probe web2.example.com5-5. Confirm GlusgerFS storage pool
# Both Web Server 1 and 2$ gluster peer status5-6. Create GlusterFS volume
# Only Web Server 1$ sudo gluster volume create server replica 2 web1.example.com:/server/ web2.example.com:/server/ force5-7. Confirm GlusgerFS volume information
# Both Web Server 1 and 2$ sudo gluster volume info5-8. Start GlusgerFS volume
# Only Web Server 1$ sudo gluster volume start server5-9. Conform GlusgerFS volume status
# Both Web Server 1 and 2$ sudo gluster volume status6. GlusterFS Clients Configuration
6-1. Install GlusgerFS Clients
# Both Web Server 1 and 2$ sudo yum -y install glusterfs glusterfs-fuse glusterfs-rdma6-2. Mount Client to Server
# Web Server 1$ sudo mkdir /client $ sudo mount -t glusterfs web1.example.com:/server /client $ sudo df -Th# Web Server 2$ sudo mkdir /client $ sudo mount -t glusterfs web2.example.com:/server /client $ sudo df -Th6-3. Auto mount GlusgerFS Server
# Web Server 1$ sudo vim /etc/fstab# Web Server 2web1.example.com:/server /client glusterfs defaults,_netdev 0 0$ sudo vim /etc/fstaboweb2.example.com:/server /client glusterfs defaults,_netdev 0 06-4. Test GlusgerFS replication
# Web Server 1$ sudo cd /client $ sudo touch test.txt $ sudo ls# Web Server 2$ sudo cd /client $ sudo ls $ sudo rm text.txt# Web Server 1$ sudo ls7. GlusgerFS Conclusion
In this post, I explained “GlusterFS” as one of the source code synchronization solutions between web servers in a clustered environment. If you use this solution, the difference in source code due to deployment time lag will not occur between web servers. In this way, once we have the foundation of the system, we will not have to use the CI tools desperately. In addition, since GlusterFS is a distributed parallel fault tolerant file system, the effective range of this solution is not limited to Web servers. Depending on how you use it, you can build any fault tolerant file system on a large system.
2017-12-17
Distributed Parallel Fault Tolerant File System with GlusterFS


 AiR&D Inc. CTO & Full Stack Engineer
WARP-WG Founder: https://warp-wg.org/
A member of IEEE, ACM, IEICE, Information Processing Society, IETF, ISOC, Artificial Central & Cranial Nerves, ScaleD.
@KyojiOsada
https://twitter.com/KyojiOsada/
@kyoji.osada
https://www.facebook.com/kyoji.osada/
# GitHub
https://github.com/KyojiOsada/
# Tech Blog for Japanese
https://qiita.com/KyojiOsada/
# Blog for Japanese
https://kyojiosada.hatenablog.com/
https://www.linkedin.com/in/kyojiosada/
2017-12-13
Seconds Access Limiter for Web API with Python, PHP, Ruby, and Perl
> to Japanese Pages1. Summary
In this article, I will describe the access limitation solution that is often required in Web APIs. In addition, I will exemplify “One-Second Access Limiter” which is one of access limit solutions using sample codes of Python, PHP, Ruby and Perl interpreter languages.2. Introduction
In the Web API service development project, we may be presented with requirements such as “access limitation within a certain period.” For example, the requirement is such that the Web API returns the HTTP status code of “429 Too Many Requests” when the number of accesses is exceeded. These designers and developers will be forced to improve the speed and reducing the load of this process. This is because if the resource load reduction is the purpose of access limitation, it is meaningless if the logic is increasing the load. In addition, when the reference time is short and the accuracy of the result is required, the accuracy of the algorithm is required. If you are an engineer with the experience of developing Web Application Firewall (WAF), you should already know these things. In the world, there are many access limitation solutions, but in this post I will provide a sample of “One-Second Access Limiter” as one of its solutions.3. Requirements
"Access limitation up to N times per second" 1. If the access exceeds N times per second, return the HTTP status code of "429 Too Many Requests" and block accesses. 2. However, the numerical value assigned to “N” depends on the specification of the project. 3. Because of the nature of access control for 1 second, this processing should not be a bottleneck of access processing capability.4. Key Points of Architectures
Even from the above requirements, it must be processed as fast and light as possible.# Prohibition of Use of Web Application Framework
Even if you are using a lightweight framework, loading a framework takes a lot of load. Therefore, this process should be implemented “before processing into the framework.”# Libraries Loading
In order to minimize the load due to library loading, it should focus on built-in processing.# Exception/Error Handling
Increasing the load by relying on the framework for exceptions and error handling makes no sense. These should be implemented simply in low-level code.# Data Resource Selection
It is better to avoid heavyweight data resources like RDBMS, but in this requirement "Eventual Consistency" is not a good idea. Realizing with Loadbalancer or Reverse Proxy is also one solution, but the more the application layer is handled, the more the processing cost of the whole communication is incurred. Semi-synchronization such as memory cache and lightweight NoSQL is one option, but in this paper I use file system as data resource. In order to prevent wait processing such as file locking, it is controlled by the file name and the number of files. However, in the case of a cluster environment, a data synchronization solution is necessary.5. Environments
The OS of sample codes is Linux. I prepared Python, PHP, Ruby, Perl as sample code languages. # "Python-3" Sample Code # "PHP-5" Sample Code # "Ruby-2" Sample Code # "Perl-5" Sample Code6. "Python" Sample Code
Seconds Access Limiter with Python. Version: Python-3#!/usr/bin/python # coding:utf-8 import time import datetime import cgi import os from pathlib import Path import re import sys import inspect import traceback import json # Definition def limitSecondsAccess(): try: # Init ## Access Timestamp Build sec_usec_timestamp = time.time() sec_timestamp = int(sec_usec_timestamp) ## Access Limit Default Value ### Depends on Specifications: For Example 10 access_limit = 10 ## Roots Build ### Depends on Environment: For Example '/tmp' tmp_root = '/tmp' access_root = os.path.join(tmp_root, 'access') ## Auth Key ### Depends on Specifications: For Example 'app_id' auth_key = 'app_id' ## Response Content-Type ### Depends on Specifications: For Example JSON and UTF-8 response_content_type = 'Content-Type: application/json; charset=utf-8' ### Response Bodies Build ### Depends on Design response_bodies = {} # Authorized Key Check query = cgi.FieldStorage() auth_id = query.getvalue(auth_key) if not auth_id: raise Exception('Unauthorized', 401) # The Auth Root Build auth_root = os.path.join(access_root, auth_id) # The Auth Root Check if not os.path.isdir(auth_root): # The Auth Root Creation os.makedirs(auth_root, exist_ok=True) # A Access File Creation Using Micro Timestamp ## For example, other data resources such as memory cache or RDB transaction. ## In the case of this sample code, it is lightweight because it does not require file locking and transaction processing. ## However, in the case of a cluster configuration, file system synchronization is required. access_file_path = os.path.join(auth_root, str(sec_usec_timestamp)) path = Path(access_file_path) path.touch() # The Access Counts Check access_counts = 0 for base_name in os.listdir(auth_root): ## A Access File Path Build file_path = os.path.join(auth_root, base_name) ## Not File Type if not os.path.isfile(file_path): continue ## The Base Name Data Type Casting base_name_sec_usec_timestamp = float(base_name) base_name_sec_timestamp = int(base_name_sec_usec_timestamp) ## Same Seconds Stampstamp if sec_timestamp == base_name_sec_timestamp: ### A Overtaken Processing if sec_usec_timestamp < base_name_sec_usec_timestamp: continue ### Access Counts Increment access_counts += 1 ### Too Many Requests if access_counts > access_limit: raise Exception('Too Many Requests', 429) continue ## Past Access Files Garbage Collection if sec_timestamp > base_name_sec_timestamp: os.remove(file_path) except Exception as e: # Exception Tuple to HTTP Status Code http_status = e.args[0] http_code = e.args[1] # 4xx if http_code >= 400 and http_code <= 499: # logging ## snip... # 5xx elif http_code >= 500: # logging # snip... ## The Exception Message to HTTP Status http_status = 'foo' else: # Logging ## snip... # HTTP Status Code for The Response http_status = 'Internal Server Error' http_code = 500 # Response Headers Feed print('Status: ' + str(http_code) + ' ' + http_status) print(response_content_type + "\n\n") # A Response Body Build response_bodies['message'] = http_status response_body = json.dumps(response_bodies) # The Response Body Feed print(response_body) # Excecution limitSecondsAccess()7. "PHP" Sample Code
Seconds Access Limiter with PHP Version: PHP-5<?php # Definition function limitSecondsAccess() { try { # Init ## Access Timestamp Build $sec_usec_timestamp = microtime(true); list($sec_timestamp, $usec_timestamp) = explode('.', $sec_usec_timestamp); ## Access Limit Default Value ### Depends on Specifications: For Example 10 $access_limit = 10; ## Roots Build ### Depends on Environment: For Example '/tmp' $tmp_root = '/tmp'; $access_root = $tmp_root . '/access'; ## Auth Key ### Depends on Specifications: For Example 'app_id' $auth_key = 'app_id'; ## Response Content-Type ## Depends on Specifications: For Example JSON and UTF-8 $response_content_type = 'Content-Type: application/json; charset=utf-8'; ## Response Bodies Build ### Depends on Design $response_bodies = array(); # Authorized Key Check if (empty($_REQUEST[$auth_key])) { throw new Exception('Unauthorized', 401); } $auth_id = $_REQUEST[$auth_key]; # The Auth Root Build $auth_root = $access_root . '/' . $auth_id; # The Auth Root Check if (! is_dir($auth_root)) { ## The Auth Root Creation if (! mkdir($auth_root, 0775, true)) { throw new Exception('Could not create the auth root. ' . $auth_root, 500); } } # A Access File Creation Using Micro Timestamp /* For example, other data resources such as memory cache or RDB transaction. * In the case of this sample code, it is lightweight because it does not require file locking and transaction processing. * However, in the case of a cluster configuration, file system synchronization is required. */ $access_file_path = $auth_root . '/' . strval($sec_usec_timestamp); if (! touch($access_file_path)) { throw new Exception('Could not create the access file. ' . $access_file_path, 500); } # The Auth Root Scanning if (! $base_names = scandir($auth_root)) { throw new Exception('Could not scan the auth root. ' . $auth_root, 500); } # The Access Counts Check $access_counts = 0; foreach ($base_names as $base_name) { ## A current or parent dir if ($base_name === '.' || $base_name === '..') { continue; } ## A Access File Path Build $file_path = $auth_root . '/' . $base_name; ## Not File Type if (! is_file($file_path)) { continue; } ## The Base Name to Integer Data Type $base_name_sec_timestamp = intval($base_name); ## Same Seconds Timestamp if ($sec_timestamp === $base_name_sec_timestamp) { ## The Base Name to Float Data Type $base_name_sec_usec_timestamp = floatval($base_name); ### A Overtaken Processing if ($sec_usec_timestamp < $base_name_sec_usec_timestamp) { continue; } ### Access Counts Increment $access_counts++; ### Too Many Requests if ($access_counts > $access_limit) { throw new Exception('Too Many Requests', 429); } continue; } ## Past Access Files Garbage Collection if ($sec_timestamp > $base_name_sec_timestamp) { @unlink($file_path); } } } catch (Exception $e) { # The Exception to HTTP Status Code $http_code = $e->getCode(); $http_status = $e->getMessage(); # 4xx if ($http_code >= 400 && $http_code <= 499) { # logging ## snip... # 5xx } else if ($http_code >= 500) { # logging ## snip... # The Exception Message to HTTP Status $http_status = 'foo'; # Others } else { # Logging ## snip... # HTTP Status Code for The Response $http_status = 'Internal Server Error'; $http_code = 500; } # Response Headers Feed header('HTTP/1.1 ' . $http_code . ' ' . $http_status); header($response_content_type); # A Response Body Build $response_bodies['message'] = $http_status; $response_body = json_encode($response_bodies); # The Response Body Feed exit($response_body); } } # Execution limitSecondsAccess(); ?>8. "Ruby" Sample Code
Seconds Access Limiter with Ruby Version: Ruby-2# Definition#!/usr/bin/ruby # -*- coding: utf-8 -*- require 'time' require 'fileutils' require 'cgi' require 'json' def limitScondsAccess begin # Init ## Access Timestamp Build time = Time.now sec_timestamp = time.to_i sec_usec_timestamp_string = "%10.6f" % time.to_f sec_usec_timestamp = sec_usec_timestamp_string.to_f ## Access Limit Default Value ### Depends on Specifications: For Example 10 access_limit = 10 ## Roots Build ### Depends on Environment: For Example '/tmp' tmp_root = '/tmp' access_root = tmp_root + '/access' ## Auth Key ### Depends on Specifications: For Example 'app_id' auth_key = 'app_id' ## Response Content-Type ### Depends on Specifications: For Example JSON and UTF-8 response_content_type = 'application/json' response_charset = 'utf-8' ## Response Bodies Build ### Depends on Design response_bodies = {} # Authorized Key Check cgi = CGI.new if ! cgi.has_key?(auth_key) then raise 'Unauthorized:401' end auth_id = cgi[auth_key] # The Auth Root Build auth_root = access_root + '/' + auth_id # The Auth Root Check if ! FileTest::directory?(auth_root) then # The Auth Root Creation if ! FileUtils.mkdir_p(auth_root, :mode => 0775) then raise 'Could not create the auth root. ' + auth_root + ':500' end end # A Access File Creation Using Micro Timestamp ## For example, other data resources such as memory cache or RDB transaction. ## In the case of this sample code, it is lightweight because it does not require file locking and transaction processing. ## However, in the case of a cluster configuration, file system synchronization is required. access_file_path = auth_root + '/' + sec_usec_timestamp.to_s if ! FileUtils::touch(access_file_path) then raise 'Could not create the access file. ' + access_file_path + ':500' end # The Access Counts Check access_counts = 0 Dir.glob(auth_root + '/*') do |access_file_path| # Not File Type if ! FileTest::file?(access_file_path) then next end # The File Path to The Base Name base_name = File.basename(access_file_path) # The Base Name to Integer Data Type base_name_sec_timestamp = base_name.to_i # Same Seconds Timestamp if sec_timestamp == base_name_sec_timestamp then ### The Base Name to Float Data Type base_name_sec_usec_timestamp = base_name.to_f ### A Overtaken Processing if sec_usec_timestamp < base_name_sec_usec_timestamp then next end ### Access Counts Increment access_counts += 1 ### Too Many Requests if access_counts > access_limit then raise 'Too Many Requests:429' end next end # Past Access Files Garbage Collection if sec_timestamp > base_name_sec_timestamp then File.unlink access_file_path end end # The Response Feed cgi.out({ ## Response Headers Feed 'type' => 'text/html', 'charset' => response_charset, }) { ## The Response Body Feed '' } rescue => e # Exception to HTTP Status Code messages = e.message.split(':') http_status = messages[0] http_code = messages[1] # 4xx if http_code >= '400' && http_code <= '499' then # logging ## snip... # 5xx elsif http_code >= '500' then # logging ## snip... # The Exception Message to HTTP Status http_status = 'foo' else # Logging ## snip... # HTTP Status Code for The Response http_status = 'Internal Server Error' http_code = '500' end # The Response Body Build response_bodies['message'] = http_status response_body = JSON.generate(response_bodies) # The Response Feed cgi.out({ ## Response Headers Feed 'status' => http_code + ' ' + http_status, 'type' => response_content_type, 'charset' => response_charset, }) { ## The Response Body Feed response_body } end end limitScondsAccess9. "Perl" Sample Code
Seconds Access Limiter with Perl Version: Perl-5#!/usr/bin/perl use strict; use warnings; use utf8; use Time::HiRes qw(gettimeofday); use CGI; use File::Basename; use JSON; # Definition sub limitSecondsAccess { eval { # Init ## Access Timestamp Build my ($sec_timestamp, $usec_timestamp) = gettimeofday(); my $sec_usec_timestamp = ($sec_timestamp . '.' . $usec_timestamp) + 0; ## Access Limit Default Value ### Depends on Specifications: For Example 10 my $access_limit = 10; ## Roots Build ### Depends on Environment: For Example '/tmp' my $tmp_root = '/tmp'; my $access_root = $tmp_root . '/access'; ## Auth Key ### Depends on Specifications: For Example 'app_id' my $auth_key = 'app_id'; ## Response Content-Type ## Depends on Specifications: For Example JSON and UTF-8 ## Response Bodies Build ### Depends on Design my %response_bodies; # Authorized Key Check my $CGI = new CGI; if (! defined($CGI->param($auth_key))) { die('Unauthorized`401`'); } my $auth_id = $CGI->param($auth_key); # The Auth Root Build my $auth_root = $access_root . '/' . $auth_id; # The Access Root Check if (! -d $access_root) { ## The Access Root Creation if (! mkdir($access_root)) { die('Could not create the access root. ' . $access_root . '`500`'); } } # The Auth Root Check if (! -d $auth_root) { ## The Auth Root Creation if (! mkdir($auth_root)) { die('Could not create the auth root. ' . $auth_root . '`500`'); } } # A Access File Creation Using Micro Timestamp ## For example, other data resources such as memory cache or RDB transaction. ## In the case of this sample code, it is lightweight because it does not require file locking and transaction processing. ## However, in the case of a cluster configuration, file system synchronization is required. my $access_file_path = $auth_root . '/' . $sec_usec_timestamp; if (! open(FH, '>', $access_file_path)) { close FH; die('Could not create the access file. ' . $access_file_path . '`500`'); } close FH; # The Auth Root Scanning my @file_pathes = glob($auth_root . "/*"); if (! @file_pathes) { die('Could not scan the auth root. ' . $auth_root . '`500`'); } # The Access Counts Check my $access_counts = 0; foreach my $file_path (@file_pathes) { ## Not File Type if (! -f $file_path) { next; } ## The Base Name Extract my $base_name = basename($file_path); ## The Base Name to Integer Data Type my $base_name_sec_timestamp = int($base_name); ## Same Seconds Timestamp if ($sec_timestamp eq $base_name_sec_timestamp) { ## The Base Name to Float Data Type my $base_name_sec_usec_timestamp = $base_name; ### A Overtaken Processing if ($sec_usec_timestamp lt $base_name_sec_usec_timestamp) { next; } ### Access Counts Increment $access_counts++; ### Too Many Requests if ($access_counts > $access_limit) { die("Too Many Requests`429`"); } next; } ## Past Access Files Garbage Collection if ($sec_timestamp gt $base_name_sec_timestamp) { unlink($file_path); } } }; if ($@) { # Error Elements Extract my @e = split(/`/, $@); # Exception to HTTP Status Code my $http_status = $e[0]; my $http_code = '0'; if (defined($e[1])) { $http_code = $e[1]; } # 4xx if ($http_code ge '400' && $http_code le '499') { # logging ## snip... # 5xx } elsif ($http_code ge '500') { # logging ## snip... ## The Exception Message to HTTP Status $http_status = 'foo'; # Others } else { # logging ## snip... $http_status = 'Internal Server Error'; $http_code = '500'; } # Response Headers Feed print("Status: " . $http_code . " " . $http_status . "\n"); print('Content-Type: application/json; charset=utf-8' . "\n\n"); # A Response Body Build my %response_bodies; $response_bodies{'message'} = $http_status; $a = \%response_bodies; my $response_body = encode_json($a); # The Response Body Feed print($response_body); } } # #Excecution &limitSecondsAccess();10. Conclusion
In this post, I exemplified a sample of “One-Second Access limiter” solution using Python, PHP, Ruby and Perl interpreter languages. Because of the nature of “access control for one second”, it will be understood that low load, high speed processing and data consistency are required. Therefore, although there are some important points, they are as described in the architecture section. In this post, I showed a solution using file name and file number of file system. However, in a clustered environment, it is unsuitable for this architecture if the selected data synchronization solution is slow. In such cases, the asynchronous data architecture may be one of the options rather. In such a case, control is made on a per-node basis. Furthermore, the importance of the load balancing threshold is increased, and the precision of the access limitation and consistency of the result must be abandoned. However, unless precision of access limitation and consistency of results are required, it is also one.
AiR&D Inc. CTO & Full Stack EngineerWARP-WG Founder: https://warp-wg.org/
A member of IEEE, ACM, IEICE, Information Processing Society, IETF, ISOC, Artificial Central & Cranial Nerves, ScaleD.
@KyojiOsada
https://twitter.com/KyojiOsada/
@kyoji.osada
https://www.facebook.com/kyoji.osada/
# GitHub
https://github.com/KyojiOsada/
# Tech Blog for Japanese
https://qiita.com/KyojiOsada/
# Blog for Japanese
https://kyojiosada.hatenablog.com/
https://www.linkedin.com/in/kyojiosada/
2017-11-19
Load Balancer with “LVS + Keepalived + DSR”
> to Japanese Pages1. Summary
In this post, I will explain the effectiveness of the load balancer solution by “LVS + Keepalived + DSR” design technology and explain how to build it.2. Introduction
The load balancer solution by “LVS + Keepalived + DSR” is a mature technology but I have posted this solution because I was asked by my friends. For highly scalable projects, the topic of the load balancer is an agenda at least once in the system performance meeting. I have done a lot of such experiences. And we will have the opportunity to hear negative opinions about the performance of the software load balancer. In such a case, the name of a hardware load balancer like BIG-IP sometimes comes up to the topic of that agenda. However, we can not miss the fact that a load balancer using “LVS + Keepalived + DSR” design technology runs at 100% SLA and 10% load factor in our project receiving 1 million accesses per day. This demonstrates that this design technology is one of the effective load balancer solutions in cloud hosting without load balancer PaaS or on premises. Such a result is brought about by using the communication method called Direct Server Return (DSR). The dramatic load reduction of the load balancer is realized by the feature of “returning it directly to the client without going through communication from the lower node” of the DSR. In addition, this solution is not affected by various hardware related problems (failure, deterioration, support contract, support quality, end of product support, etc.). In this post, I will explain how to build “LVS + Keepalived + DSR” design. In addition, in this post, I will not specifically conduct benchmarks such as “DSR VS. Not DSR”.3. Environment
In this post, I will explain the solution based on the following assumptions.In this post, I will explain the solution based on the following system configuration diagram.CentOS 7 Keepalived ipvsadm Firewalld
4. Install
First, we install the “Keeplived” on the Load Balancer 1.$ sudo yum -y install keepalivedNext, we install the “Keeplived” on the Load Balancer 2.$ sudo yum -y install keepalivedNext, we install the “ipvsadm” on the Load Balancer 1.$ sudo yum -y install ipvsadmNext, we install the “ipvsadm” on the Load Balancer 2.$ sudo yum -y install ipvsadm5. Configuration
Next, we configure the “firewalld” on the Web Server 1. We startup the “firewalld” and enable it.$ sudo systemctl start firewalld $ sudo systemctl enable firewalld $ sudo systemctl status firewalldWe configure the “firewalld.”$ sudo firewall-cmd --set-default-zone=internal $ sudo firewall-cmd --add-port=22/tcp --zone=internal $ sudo firewall-cmd --add-port=22/tcp --zone=internal --permanent $ sudo firewall-cmd --add-port=80/tcp --zone=internal $ sudo firewall-cmd --add-port=80/tcp --zone=internal --permanent $ sudo firewall-cmd --add-port=443/tcp --zone=internal $ sudo firewall-cmd --add-port=443/tcp --zone=internal --permanent $ sudo firewall-cmd --direct --add-rule ipv4 nat PREROUTING 0 -d 10.0.0.3 -j REDIRECT $ sudo firewall-cmd --permanent --direct --add-rule ipv4 nat PREROUTING 0 -d 10.0.0.3 -j REDIRECT $ sudo firewall-cmd --direct --add-rule ipv4 nat PREROUTING 0 -d 10.0.0.5 -j REDIRECT $ sudo firewall-cmd --permanent --direct --add-rule ipv4 nat PREROUTING 0 -d 10.0.0.5 -j REDIRECTWe reload the “firewalld” and confirm the configuration.$ sudo firewall-cmd --reload $ sudo firewall-cmd --list-all-zone $ sudo firewall-cmd --direct --get-rule ipv4 nat PREROUTINGWe use the “telnet” command to verify the communication of the Web Server 1.$ sudo telnet 10.0.0.3 80Next, we configure the “firewalld” on the Web Server 2. We startup the “firewalld” and enable it.$ sudo systemctl start firewalld $ sudo systemctl enable firewalld $ sudo systemctl status firewalldWe configure the “firewalld.”$ sudo firewall-cmd --set-default-zone=internal $ sudo firewall-cmd --add-port=22/tcp --zone=internal $ sudo firewall-cmd --add-port=22/tcp --zone=internal --permanent $ sudo firewall-cmd --add-port=80/tcp --zone=internal $ sudo firewall-cmd --add-port=80/tcp --zone=internal --permanent $ sudo firewall-cmd --add-port=443/tcp --zone=internal $ sudo firewall-cmd --add-port=443/tcp --zone=internal --permanent $ sudo firewall-cmd --direct --add-rule ipv4 nat PREROUTING 0 -d 10.0.0.4 -j REDIRECT $ sudo firewall-cmd --permanent --direct --add-rule ipv4 nat PREROUTING 0 -d 10.0.0.4 -j REDIRECT $ sudo firewall-cmd --direct --add-rule ipv4 nat PREROUTING 0 -d 10.0.0.5 -j REDIRECT $ sudo firewall-cmd --permanent --direct --add-rule ipv4 nat PREROUTING 0 -d 10.0.0.5 -j REDIRECTWe reload the “firewalld” and confirm the configuration.$ sudo firewall-cmd --reload $ sudo firewall-cmd --list-all-zone $ sudo firewall-cmd --direct --get-rule ipv4 nat PREROUTINGWe use the “telnet” command to verify the communication of the Web Server 2.$ sudo telnet 10.0.0.4 80Next, we configure the “Keepalived” on the Load Balancer 1.$ sudo cp -a /etc/keepalived/keepalived.conf /etc/keepalived/keepalived.conf.org $ sudo vim /etc/keepalived/keepalived.conf; Common Configuration Block global_defs { notification_email { alert@example.com } notification_email_from lb1@example.com smtp_server mail.example.com smtp_connect_timeout 30 router_id lb1.example.com } ; Master Configureation Block vrrp_instance VI_1 { state MASTER interface eth0 virtual_router_id 1 priority 101 nopreempt advert_int 1 authentication { auth_type PASS auth_pass foo } virtual_ipaddress { 10.0.0.5/24 dev eth0 } } ; Virtual Server Configureation Block virtusl_server 10.0.0.5 80 { delay_loop 6 lvs_sched rr lvs_method DR persistence_timeout 50 protocol TCP sorry_server 10.0.0.254 80 real_server 10.0.0.3 80 { weight 1 inhibit_on_failure HTTP_GET { url { path / status_code 200 } connect_timeout 3 nb_get_retry 3 delay_before_retry 3 } } real_server 10.0.0.4 80 { weight 1 inhibit_on_failure HTTP_GET { url { path / status_code 200 } connect_timeout 3 nb_get_retry 3 delay_before_retry 3 } } }$ sudo systemctl start keepalivedIn case of failback prohibition, you should disable automatic startup of “Keepalived”.$ :sudo systemctl enable keepalived $ sudo systemctl status keepalived $ sudo ip addrNext, we configure the “Keepalived” on the Load Balancer 2.$ sudo cp -a /etc/keepalived/keepalived.conf /etc/keepalived/keepalived.conf.org $ sudo vim /etc/keepalived/keepalived.conf; Common Configuration Block global_defs { notification_email { admin@example.com } notification_email_from lb2@example.com smtp_server mail.example.com smtp_connect_timeout 30 router_id lb2.example.com } ; Backup Configureation Block vrrp_instance VI_1 { state BACKUP interface eth0 virtual_router_id 1 priority 100 nopreempt advert_int 1 authentication { auth_type PASS auth_pass foo } virtual_ipaddress { 10.0.0.5/24 dev eth0 } } ; Virtual Server Configureation Block virtusl_server 10.0.0.5 80 { delay_loop 6 lvs_sched rr lvs_method DR persistence_timeout 50 protocol TCP sorry_server 10.0.0.254 80 real_server 10.0.0.3 80 { weight 1 inhibit_on_failure HTTP_GET { url { path / status_code 200 } connect_timeout 3 nb_get_retry 3 delay_before_retry 3 } } real_server 10.0.0.4 80 { weight 1 inhibit_on_failure HTTP_GET { url { path / status_code 200 } connect_timeout 3 nb_get_retry 3 delay_before_retry 3 } } }$ sudo systemctl start keepalivedIn case of failback prohibition, you should disable automatic startup of “Keepalived”.$ :sudo systemctl enable keepalived $ sudo systemctl status keepalived $ sudo ip addrNext, we change the kernel parameters on the Load Balancer 1.$ sudo vim /etc/sysctl.confWe reflect the setting of the kernel parameters.# Enable Packet Transfer between Interfaces net.ipv4.ip_forward = 1 # Do not discard packets from networks that do not belong to the interface. net.ipv4.conf.all.rp_filter = 0$ sudo sysctl -p net.ipv4.ip_forward = 1 net.ipv4.conf.all.rp_filter = 0We startup the “ipvsadm.”$ sudo touch /etc/sysconfig/ipvsadm $ sudo systemctl start ipvsadmIn case of failback prohibition, you should disable automatic startup of “ipvsadm”.$ :sudo systemctl enable ipvsadm $ sudo systemctl status ipvsadmNext, we change the kernel parameters on the Load Balancer 2.$ sudo vim /etc/sysctl.confWe reflect the setting of the kernel parameters.# Enable Packet Transfer between Interfaces net.ipv4.ip_forward = 1 # Do not discard packets from networks that do not belong to the interface. net.ipv4.conf.all.rp_filter = 0$ sudo sysctl -p net.ipv4.ip_forward = 1 net.ipv4.conf.all.rp_filter = 0We startup the “ipvsadm.”$ sudo touch /etc/sysconfig/ipvsadm $ sudo systemctl start ipvsadmIn case of failback prohibition, you should disable automatic startup of “ipvsadm”.$ :sudo systemctl enable ipvsadm $ sudo systemctl status ipvsadmWe will use the “ipvsadm” command to check the LVS communication settings on the Load Balancer 1.$ sudo ipvsadm -LnWe will use the “ipvsadm” command to check the LVS communication settings on the Load Balancer 2.$ sudo ipvsadm -Ln6. Conclusion
In this way, we can improve performance degradation against high load, which is a weak point of software load balancer, with the DSR technology.
 AiR&D Inc. CTO & Full Stack Engineer
WARP-WG Founder: https://warp-wg.org/
A member of IEEE, ACM, IEICE, Information Processing Society, IETF, ISOC, Artificial Central & Cranial Nerves, ScaleD.
@KyojiOsada
https://twitter.com/KyojiOsada/
@kyoji.osada
https://www.facebook.com/kyoji.osada/
# GitHub
https://github.com/KyojiOsada/
# Tech Blog for Japanese
https://qiita.com/KyojiOsada/
# Blog for Japanese
https://kyojiosada.hatenablog.com/
https://www.linkedin.com/in/kyojiosada/
2017-11-04
Surrogate Key VS. Natural Key
Surrogate Key VS. Natural Key
The other day, I discussed a "Surrogate Key VS. Natural Key" in a development project.

I sometimes come across such discussions.

This will be a brush up of my post in the past but I will post the best solution for this problem.

Furthermore, this is not only the case of the title of this post but also the basic way of thinking and solution of problems for such type of discussion.

If you are suffering about this matter in the design of the RDBMS. For your information.


If we want to solve the problem of this discussion, we must first change the recognition of the surrogate key to a artificial key before you get into the main theme.

First of all, we have to solve from the misunderstanding of "Surrogate Key VS. Natural Key" controversy contagious in the world.

The true meaning of this discussion should be "Artificial Key VS. Natural Key".

A natural key is a primary key designed by a single entity attribute or a combination of a plurality of entity attributes as you know.

A surrogate key is a primary key designed as a substitute for a natural key when it is difficult to design a natural key.

An artificial key is a primary key designed to increment an integer value mechanically, irrespective of the natural key design.

Therefore, even natural key believers, if it is difficult to design a natural key, they use the surrogate key as a matter of course.

However, it can be said that the artificial key faction does not use the natural key almost.

From the above, the misunderstanding of the "Surrogate Key VS. Natural Key" controversy would have been solved.

If you try to advance the discussion while misunderstanding this, there is a possibility that the argument may go off, so it would be better to first be aware of the misunderstanding.

Therefore, hereinafter, I will name the title "Artificial Key VS. Natural Key".


Natural key believers like natural keys in terms of the beauty of relational models and the pursuit of data design.

This trend is common among engineers who grew up with DBA and good old design method.

Meanwhile, the artificial key faction tends to favor artificial keys from aspects such as framework regulation, reduction of SQL bugs and simplicity of relations.

This trend is common among programmers and engineers who grew up with recent speed design.

There are reasons why I chose the words "believer" and "faction" in the above, but I will explain in detail later.

In the RDBMS design, "Artificial Key VS. Natural Key" has both merits and demerits in both cases.

If you are a top engineer, you must clearly understand that the criteria for choosing designs must be based on the objectives and priorities of the project.

If you are suffering from the problem of this discussion, the solution is simple.

The only thing we should do is to investigate the merits and demerits and judge it according to the situation of the project.

That's it.

We should seek both opinions and know the experience for the purpose of the project.

Therefore, in all situations, there is never a fact that either one is absolutely correct.

If we misunderstand that just the correctness of both opinions is the purpose, the problem of this discussion of the project will probably not be solved forever.

If we discuss at a level other than the purpose of the project, this sort of discussion will quickly evolve into a controversy due to the personal aspect.

If we do not have the purpose consciousness of the project, we will judge with a more subjective impression.

Why is this because, in each premise, each is correct.

For this reason, I used the words "believer" and "faction" as above.

Therefore, the only solution to this discussion is to match the members' sense of purpose in the project.

In other words, matching a purpose consciousness means that we need "ability to see the essence" and "organization development capability".
AiR&D Inc. CTO & Full Stack EngineerWARP-WG Founder: https://warp-wg.org/
A member of IEEE, ACM, IEICE, Information Processing Society, IETF, ISOC, Artificial Central & Cranial Nerves, ScaleD.
@KyojiOsada
https://twitter.com/KyojiOsada/
@kyoji.osada
https://www.facebook.com/kyoji.osada/
# GitHub
https://github.com/KyojiOsada/
# Tech Blog for Japanese
https://qiita.com/KyojiOsada/
# Blog for Japanese
https://kyojiosada.hatenablog.com/
https://www.linkedin.com/in/kyojiosada/
2017-10-07
Integration of PHP Error Handling
Integration of PHP Error Handling
Last week, on how to integrate PHP 5 error handling, I was asked to explain at multiple development projects.
As used herein, "Integration of PHP Error Handling" means, for example, the following development requirements.
Here, we describe these realization methods.
As used herein, "Integration of PHP Error Handling" means, for example, the following development requirements.
# Normal Error
# Exception
# PHP Core Error
↓
We want to integrate and manage error handling such as logs and mails when these occur.
Here, we describe these realization methods.
Notice
# In this article, we will focus on these implementation methods.
# In this article, we do not mention general concepts such as "difference between error and exception".
# In this article, we describe it only for suspend processing.
# In this article, we do not mention restoration processing, trigger, processing level etc.
# This article applies only to PHP 5. It does not apply to PHP 7.
Flow
One way to realize this "PHP error integration processing" is the flow of error processing as follows.Normal Error Processing ← Normal Error
↓
Exception Processing ← Exception
↓
Shutdown Processing ← PHP Core Error
Normal Error Handling
First, take handling authority of PHP Normal Error or User-Defined Error from PHP.In PHP, the following functions are prepared.
mixed set_error_handler(callable $error_handler [, int $error_types = E_ALL | E_STRICT])(Be sure to register it as early as possible of a series of request processing.)
Within the callback function, take the normal error and rethrow as an exception.
In short, the goal is to take the normal error handling authority from PHP, and pass it to the exception.
However, in this callback function, it is one point that PHP core error can not be taken.
public function handleError()
{
    //* Error Handler Definition
    function handleError($_number, $_message, $_file, $_line, $_contexts)
    {
         //* Not Includ Error Reporting
         if (! (error_reporting() & $_number)) {
             return;
         }
        //* to ErrorException
        throw new ErrorException($_message, 500, $_number, $_file, $_line);
    }

    //* Error Handler Set
    set_error_handler('handleError');
}
Exception Handling
Next, take exception processing authority which was not caught from PHP.In PHP, the following functions are prepared.
callable set_exception_handler(callable $exception_handler)(Be sure to register it as early as possible of a series of request processing.)
As a result, all normal errors and all uncaught exceptions are aggregated in one place.
But this is not enough.
We have not taken PHP Core Error yet.
Therefore, processing logic is not placed here.
public function handleException()
{
    //* Exception Handler Definition
    function handleException($_e)
    {
        //* Exception Context
         $_SERVER['X_EXCEPTION_HANDLER_CONTEXT'] = $_e;

         //* Error Processing to Shutdown Logic
         exit;
    }

    //* Exception Handler Set
    set_exception_handler('handleException');
}
PHP Core Error Handling
In PHP 5, set_error_handler () can not take the processing authority of core error issued by PHP.PHP 5 does not throw an exception of core error.
Therefore, in order to capture the PHP core error, the following function is used.
void register_shutdown_function(callable $callback [, mixed $parameter [, mixed $... ]])Utilizing this property, it is possible to integrate all processing such as error, exception, PHP core error, etc. as a result.
public function handleShutdown($_error_mails = array())
{
    //* Shutdown Function Definition
    function handleShutdown($_error_numbers = array(), $_error_mails = array(), $_http_status_codes = array())
    {
        //* Exception or Error
        if (! empty($_SERVER['X_EXCEPTION_HANDLER_CONTEXT'])) {
            $e = $_SERVER['X_EXCEPTION_HANDLER_CONTEXT'];
            unset($_SERVER['X_EXCEPTION_HANDLER_CONTEXT']);
            $message = $e->__toString();
            $code = $e->getCode();
        } else {
            $e = error_get_last();
            //* Normal Exit
            if (empty($e)) {
                return;
            }

            //* Core Error
            $message = $_error_numbers[$e['type']] . ': ' . $e['message'] . ' in ' . $e['file'] . ' on line ' . $e['line'];
            $code = 500;
        }

        //* Error Logging
        error_log($message, 4);

        //* Error Mail
        $cmd = 'echo "' . $message . '" | mail -S "smtp=smtp://' . $_error_mails['host'] . '" -r "' . $_error_mails['from'] . '" -s "' . $_error_mails['subject'] . '" ' . $_error_mails['to'];
        $outputs = array();
        $status = null;
        $last_line = exec($cmd, $outputs, $status);

        //* HTTP Status Code
        header('HTTP/1.1 ' . $code . ' ' . $_http_status_codes[$code]);

        //* Shutdown
        exit($code . ' ' . $_http_status_codes[$code]);
    }

    //* Shutdown Function Registration
    $error_numbers = self::$error_numbers;
    $http_status_codes = self::$http_status_codes;
    register_shutdown_function('handleShutdown', $error_numbers, $_error_mails, $http_status_codes);
}
to Class Library
When these are made into a general purpose class library, it becomes as follows.Logging, e-mail, exception context delivery, etc. should be changed according to circumstances.
class AppE
{

    public static $error_numbers = array(
        1 => 'Fatal',
        2 => 'Warning',
        4 => 'Parse Error',
        8 => 'Notice',
        16 => 'Core Fatal',
        32 => 'Core Warning',
        64 => 'Compile Error',
        128 => 'Compile Warning',
        256 => 'Ex Error',
        512 => 'Ex Warning',
        1024 => 'Ex Notice',
        2048 => 'Strict Error',
        4096 => 'Recoverable Error',
        8192 => 'Deprecated',
        16384 => 'Ex Deprecated',
        32767 => 'All',
    );

    //* HTTP Status Code
    public static $http_status_codes = array(
        'default' => 200,
        100 => 'Continue',
        101 => 'Switching Protocols',
        102 => 'Processing',
        200 => 'OK',
        201 => 'Created',
        202 => 'Accepted',
        203 => 'Non-Authoritative Information',
        204 => 'No Content',
        205 => 'Reset Content',
        206 => 'Partial Content',
        207 => 'Multi-Status',
        226 => 'IM Used',
        300 => 'Multiple Choices',
        301 => 'Moved Permanently',
        302 => 'Found',
        303 => 'See Other',
        304 => 'Not Modified',
        305 => 'Use Proxy',
        307 => 'Temporary Redirect',
        400 => 'Bad Request',
        401 => 'Unauthorized',
        402 => 'Payment Required',
        403 => 'Forbidden',
       404 => 'Not Found',
       405 => 'Method Not Allowed',
       406 => 'Not Acceptable',
       407 => 'Proxy Authentication Required',
       408 => 'Request Timeout',
       409 => 'Conflict',
       410 => 'Gone',
       411 => 'Length Required',
       412 => 'Precondition Failed',
       413 => 'Request Entity Too Large',
       414 => 'Request-URI Too Long',
       415 => 'Unsupported Media Type',
       416 => 'Requested Range Not Satisfiable',
       417 => 'Expectation Failed',
       418 => "I'm a teapot",
       422 => 'Unprocessable Entity',
       423 => 'Locked',
       424 => 'Failed Dependency',
       426 => 'Upgrade Required',
       500 => 'Internal Server Error',
       501 => 'Not Implemented',
       502 => 'Bad Gateway',
       503 => 'Service Unavailable',
       504 => 'Gateway Timeout',
       505 => 'HTTP Version Not Supported',
       506 => 'Variant Also Negotiates',
       507 => 'Insufficient Storage',
       509 => 'Bandwidth Limit Exceeded',
       510 => 'Not Extended',
    );


    public function __construct()
    {}


    public function handleError()
    {
        //* Error Handler Definition
        function handleError($_number, $_message, $_file, $_line, $_contexts)
        {
             //* Not Includ Error Reporting
             if (! (error_reporting() & $_number)) {
                 return;
             }
            //* to ErrorException
            throw new ErrorException($_message, 500, $_number, $_file, $_line);
        }

        //* Error Handler Set
        set_error_handler('handleError');
    }


    public function handleException()
    {
        //* Exception Handler Definition
        function handleException($_e)
        {
            //* Exception Context
             $_SERVER['X_EXCEPTION_HANDLER_CONTEXT'] = $_e;

             //* Error Processing to Shutdown Logic
             exit;
        }

        //* Exception Handler Set
        set_exception_handler('handleException');
    }


    public function handleShutdown($_error_mails = array())
    {
        //* Shutdown Function Definition
        function handleShutdown($_error_numbers = array(), $_error_mails = array(), $_http_status_codes = array())
        {
            //* Exception or Error
            if (! empty($_SERVER['X_EXCEPTION_HANDLER_CONTEXT'])) {
                $e = $_SERVER['X_EXCEPTION_HANDLER_CONTEXT'];
                unset($_SERVER['X_EXCEPTION_HANDLER_CONTEXT']);
                $message = $e->__toString();
                $code = $e->getCode();
            } else {
                $e = error_get_last();
                //* Normal Exit
                if (empty($e)) {
                    return;
                }

                //* Core Error
                $message = $_error_numbers[$e['type']] . ': ' . $e['message'] . ' in ' . $e['file'] . ' on line ' . $e['line'];
                $code = 500;
            }

            //* Error Logging
            error_log($message, 4);

            //* Error Mail
            $cmd = 'echo "' . $message . '" | mail -S "smtp=smtp://' . $_error_mails['host'] . '" -r "' . $_error_mails['from'] . '" -s "' . $_error_mails['subject'] . '" ' . $_error_mails['to'];
            $outputs = array();
            $status = null;
            $last_line = exec($cmd, $outputs, $status);

            //* HTTP Status Code
            header('HTTP/1.1 ' . $code . ' ' . $_http_status_codes[$code]);

            //* Shutdown
            exit($code . ' ' . $_http_status_codes[$code]);
        }

        //* Shutdown Function Registration
        $error_numbers = self::$error_numbers;
        $http_status_codes = self::$http_status_codes;
        register_shutdown_function('handleShutdown', $error_numbers, $_error_mails, $http_status_codes);
    }

}
Afterword
Many PHP frameworks provide interfaces for extended error handlers and extended exception handlers, but their contents merely implement similar things.Recently, when the story of this layer came up, the number of engineers who understood these technologies has become really few.
This is what has been said from around the time the non-Java web application framework came out.
I realize that it has become a reality at many development sites.
A lot of recent engineers use the framework, that is not a means, it has become a purpose.
It can be seen from the fact that the number of engineers who do not know the basis of Web application development has increased.
In this way, the factor that the number of tool engineers has increased.
One of them is the increase in speed development method like Silicon Valley.
It is by no means negative.
In short, if we categorize the category of development engineers more subdivided, the misrecognition of mutual recognition will probably decrease.
AiR&D Inc. CTO & Full Stack EngineerWARP-WG Founder: https://warp-wg.org/
A member of IEEE, ACM, IEICE, Information Processing Society, IETF, ISOC, Artificial Central & Cranial Nerves, ScaleD.
@KyojiOsada
https://twitter.com/KyojiOsada/
@kyoji.osada
https://www.facebook.com/kyoji.osada/
# GitHub
https://github.com/KyojiOsada/
# Tech Blog for Japanese
https://qiita.com/KyojiOsada/
# Blog for Japanese
https://kyojiosada.hatenablog.com/
https://www.linkedin.com/in/kyojiosada/
2017-06-25
Distributed Model Semantics
I sometimes receive questions from engineers at lectures on Distributed and Cooperative Autonomous Network Systems, ML, working groups and others.
"Chief, I think that model is not a Distributed Model, but a Replicated Model."
Many engineers misunderstand how to catch this semantics.
In the case of this semantics, the Distributed Model is as follows.
∀x ( x ∈ Replicated → x ∈ Deistributed )
Replicated ⊆ Distributed
∀x ( x ∈ Segmented → x ∈ Deistributed )
Segmented ⊆ Distributed
Distributed = { Replicated, Segmented, ... }
Replicated != Segmented
Why does such a misunderstanding happen?
What can be considered as the cause is ambiguous explanation of RAID level or ambiguous naming of distributed system middleware.
For example, although not strictly a mistake,
ex.) Striping of raid 0 is Distributed Model.
ex.) Mirroring of raid 1 is Replicated Model.
As it explains, many engineers misunderstand.
Both RAID 0 and RAID 1 are Distributed Model.
The RAID 0 Model distributes the data after spliting the data.
The RAID 1 Model distributes the data after replicating the data.
If I write so far, you will understand anymore. Both are Distributed Model.
Of course, it is a Distributed Model because it distributes data.
If you do not distribute and arrange the data, it is not a Distributed Model.
This semantics also does not depend on distributing units.
Whether it is a bit unit, a block unit, a chunk unit, a record unit, a table unit, a file unit, a data resource unit, a node unit, or a cluster It might be a unit.
These are all Distributed Models for the purpose such as HA.
AiR&D Inc. CTO & Full Stack EngineerWARP-WG Founder: https://warp-wg.org/
A member of IEEE, ACM, IEICE, Information Processing Society, IETF, ISOC, Artificial Central & Cranial Nerves, ScaleD.
@KyojiOsada
https://twitter.com/KyojiOsada/
@kyoji.osada
https://www.facebook.com/kyoji.osada/
# GitHub
https://github.com/KyojiOsada/
# Tech Blog for Japanese
https://qiita.com/KyojiOsada/
# Blog for Japanese
https://kyojiosada.hatenablog.com/
https://www.linkedin.com/in/kyojiosada/
Hot Standby HA Architecture Pattern on AWS EC2
Hot Standby HA of No E/ALB by Unicast VRRP
This Hot Standby HA Architecture Pattern realizes VRRP monitor by Unicast in the AWS network that Multicast can not use.
In particular, this design is a useful HA architecture pattern in staging environments of small projects and so on which costs such as E/ALB SaaS need not be paid.
In particular, this design is a useful HA architecture pattern in staging environments of small projects and so on which costs such as E/ALB SaaS need not be paid.
EC2 + RHEL7 + Unicast VRRP + Failure Scripts
- IaaS: AWS EC2
- OS: RHEL 7 or CentOS 7
- Unicast VRRP: keepalived
- Failover & Failback Scripts: Bash + AWS CLI
keepalived Install & Configuration
$ : Node 1
$ sudo yum -y install keepalived
$ sudo cp -a /etc/keepalived/keepalived.conf /etc/keepalived/keepalived.conf.org
$ sudo vim /etc/keepalived/keepalived.conf
! Configuration File for keepalived

global_defs {
    notification_email {
        admin@example.com
    }
    notification_email_from node1@example.com
    smtp_server mail.example.com
    smtp_connect_timeout 30
    router_id node1.example.com
}

vrrp_instance VI_0 {
    state MASTER
    interface eth0
    virtual_router_id 10
    priority 101
    nopreempt
    advert_int 1
    authentication {
        auth_type PASS
        auth_pass foo
    }

    ! VIP
    virtual_ipaddress {
        10.10.10.10 dev eth0
    }

    ! Node 1
    unicast_src_ip 10.10.10.11

    ! Node2
    unicast_peer {
        10.10.10.12
    }
}
$ : Node 2
$ sudo yum -y install keepalived
$ sudo cp -a /etc/keepalived/keepalived.conf /etc/keepalived/keepalived.conf.org
$ sudo vim /etc/keepalived/keepalived.conf
! Configuration File for keepalived

global_defs {
    notification_email {
        admin@example.com
    }
    notification_email_from node2@example.com
    smtp_server mail.example.com
    smtp_connect_timeout 30
    router_id node2.example.com
}

vrrp_instance VI_0 {
    state BACKUP
    interface eth0
    virtual_router_id 10
    priority 100
    nopreempt
    advert_int 1
    authentication {
        auth_type PASS
        auth_pass foo
    }

    ! VIP
    virtual_ipaddress {
        10.10.10.10 dev eth0
    }

    ! Node 2
    unicast_src_ip 10.10.10.12

    ! Node 1
    unicast_peer {
        10.10.10.11
    }

    ! Failover Script
    notify_master "/etc/keepalived/failover.sh"
}
Failback Script (Bash + AWS CLI)
$ : Node 1
$ : for manual failback
$ sudo touch /etc/keepalived/failback.sh
$ sudo vim /etc/keepalived/failback.sh
#!/bin/bash
# failback.sh

# LAN VIP
VIP=10.10.10.10

# WAN VIP
ALLOCATION_ID=eipalloc-xxxxxxx0

# Instance 1 eth0 IF
INTERFACE_ID_1=eni-xxxxxxx1

# Instance 2 eth0 IF
INTERFACE_ID_2=eni-xxxxxxx2

# Instance ID
INSTANCE_ID=`curl -s http://169.254.169.254/latest/meta-data/instance-id`

# Auth
export AWS_DEFAULT_REGION=`curl -s http://169.254.169.254/latest/meta-data/placement/availability-zone | rev | cut -c 2- | rev`

# LAN VIP Unassitnment
aws ec2 unassign-private-ip-addresses --private-ip-addresses $VIP --network-interface-id $INTERFACE_ID_2

# LAN VIP Assignment
aws ec2 assign-private-ip-addresses --private-ip-addresses $VIP --network-interface-id $INTERFACE_ID_1 --allow-reassignment

# WAN VIP Asoociation
aws ec2 associate-address --allocation-id $ALLOCATION_ID --network-interface-id $INTERFACE_ID_1 --private-ip-address $VIP
Failover Script (Bash + AWS CLI)
$ : Node 2
$ : for auto failover
$ sudo touch /etc/keepalived/faiover.sh
$ sudo vim /etc/keepalived/faiover.sh
#!/bin/bash
# failover.sh

# LAN VIP
VIP=10.10.10.10

# WAN VIP
ALLOCATION_ID=eipalloc-xxxxxxx0

# Instance 1 eth0 IF
INTERFACE_ID_1=eni-xxxxxxx1

# Instance 2 eth0 IF
INTERFACE_ID_2=eni-xxxxxxx2

# Instance ID
INSTANCE_ID=`curl -s http://169.254.169.254/latest/meta-data/instance-id`

# Auth
export AWS_DEFAULT_REGION=`curl -s http://169.254.169.254/latest/meta-data/placement/availability-zone | rev | cut -c 2- | rev`

# LAN VIP Unassitnment
aws ec2 unassign-private-ip-addresses --private-ip-addresses $VIP --network-interface-id $INTERFACE_ID_1

# LAN VIP Assignment
aws ec2 assign-private-ip-addresses --private-ip-addresses $VIP --network-interface-id $INTERFACE_ID_2 --allow-reassignment

# WAN VIP Asoociation
aws ec2 associate-address --allocation-id $ALLOCATION_ID --network-interface-id $INTERFACE_ID_2 --private-ip-address $VIP
keepalived Daemon Start
$ : Node 1
$ sudo systemctl start keepalived
$ sudo systemctl enable keepalived
$ sudo systemctl status keepalived
$ sudo ip addr
$ : Node 2
$ sudo systemctl start keepalived
$ sudo systemctl enable keepalived
$ sudo systemctl status keepalived
$ sudo ip addr
Auto Failover Test
$ : Node 1
$ sudo systemctl stop keepalived
$ sudo systemctl status keepalived
$ sudo ip addr
$ : Node 2
$ sudo ip addr
Manual Failback Test
$ : Node 1
$ sudo systemctl start keepalived
$ sudo systemctl status keepalived
$ : Node 2
$ sudo /etc/keepalived/failback.sh
$ sudo ip addr
$ : Node 1
$ sudo ip addr
AiR&D Inc. CTO & Full Stack EngineerWARP-WG Founder: https://warp-wg.org/
A member of IEEE, ACM, IEICE, Information Processing Society, IETF, ISOC, Artificial Central & Cranial Nerves, ScaleD.
@KyojiOsada
https://twitter.com/KyojiOsada/
@kyoji.osada
https://www.facebook.com/kyoji.osada/
# GitHub
https://github.com/KyojiOsada/
# Tech Blog for Japanese
https://qiita.com/KyojiOsada/
# Blog for Japanese
https://kyojiosada.hatenablog.com/
https://www.linkedin.com/in/kyojiosada/
Subscribe to:
Comments (Atom)